
UL Access door

Installation in only 30 minutes

UL ULC doors meet or exceed all NFPA 96 requirements

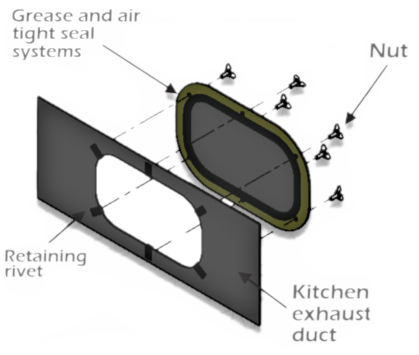
UL/ULC approved grease duct access doors are the perfect solution to allow proper cleaning of commercial hood ducts.

The advantage of installing access doors at the end of the work

The main advantage of UL ULC access doors installed at the end of the work (without any welding), is to ensure compulsory access for the maintenance of the conduits. It is often demonstrated during duct cleaning (by Cadexair IKECA certified cleaning teams), that many doors initially installed are made inaccessible. Lack of space and coordination in HVAC, plumbing, electromechanical and architectural components is a problem in the construction industry. If the installation of access doors is carried out at the start of the project, there is a high probability that the doors will be blocked or simply inaccessible at the end of the project. By installing them at the end of the work, it is ensured that they remain accessible for future inspections and maintenance, as required by NFPA 96.

Where do we install access doors on the welded ducts in accordance with the existing standards ?

According to NFPA96 in effect, a maximum interval of 12 feet between each access door and changes of direction must be respected, for horizontal ducts, as well as on all floors for vertical ducts.

Easy, efficient, economical and without any welding !

UL 1978 approved access doors are lightweight and have a single rigid handle to eliminate misalignment problems so often encountered when installing these types of doors. They are available in different shapes and sizes. Easy to install thanks to a self-adhesive cutting template, no frame required, no welding required and no tools needed for disassembly or reinstallation.

Installation Instructions

  1. Remove backing from this template.
  2. Position template on the side or top of the duct in the desired location. Make sure template is secure so that it does not move during the installation.
  3. Using a 5/16″ drill bit, drill a hole at each location shown on the template.
  4. Cut opening in the duct along the line shown
  5. Remove the remainder of the template from the duct.
  6. Install a retaining clip at each 5/16″ hole location.
  7. Locate access door over opening so that at least one hole in the door is aligned with a retaining clip.
  8. Loosely install a wing screw to temporarily hold the door in place.
  9. Loosely install the remaining wing screws so that each hole in the access door has a fastener.
  10. Tighten each wing screw fastener until the gasket is in contact with the duct wall.
  11. Finger tighten each wing screw fastener until snug.